
The grand piano is often the showpiece in recitals and concerts so it needs to look its absolute best. At home, you may care even more about your grand piano. Detailing such a beautiful and articulate instrument may seem intimidating at first but with the correct tools and instruction, you’ll have it looking its best in no time.
When detailing a grand piano, focus on the exterior first. Using a microfiber cloth and appropriate cleaner for your piano finish, start with the legs, then the body and finish with the keys. For the interior, use a vacuum first to remove the dust and then your cloth or soft brush on the internal components. Finally polish the exterior for a nice shine.
We’ll go into a lot more depth below so you will walk through which tools you need and the best techniques for cleaning a grand piano.
Preliminary Inspection
If you’ve never seen the inside of your grand piano, take the time to do so. Start by checking out the exterior, being alert for any flaws or damage that might have been unnoticed. Take notes on any areas that will require special cleaning as well as other maintenance. Once this check is complete, open the lid or cover to expose the interior. At this time, inspect each section to see what you’ll need to consider in terms of grand piano cleaning techniques. For many, dust or dirt proves to be the most consistently found problems, even in the cleanest of environments. In other cases where the piano has been exposed to the elements, mold or mildew may also be found; in this case, we’d recommend having a professional take a look.
Tools Of The Trade
What you’ll need:
- Microfiber cloths
- Piano polish (for gloss pianos)
- Small vacuum (optional but highly recommended)
- Key-brite (optional)
- Piano pin cleaning brush (optional)
- Detailing kit (Includes microfiber cloths, polish, Key-brite, and brush – great if you need everything)
Any professional cleaner will also tell you it’s about the best tools and items.
For this and every cleaning session, you may want to put on some protective gear. A mask, such as those found on professional painters, helps to prevent dust from reaching respiratory systems. Latex or nitrile gloves are also recommended as a form of protection for both the instrument itself and your skin. During vacuuming, safety goggles are key to preventing eye injuries. Their presence gives allergy users some added protection as well against the usual allergens.
You’ll need quality microfiber cloths. Pick up several, you’ll need them along the way as various grand piano cleaning techniques require their own separate cloths.
 In terms of brushes, there are some available for specific piano parts like pins. These brushes are shaped to present optimum results as they touch the specific areas that many tools have trouble reaching. If that is too expensive or presents a problem, paint brushes and even soft toothbrushes can also produce results. Just be sure to measure out which brushes you’ll need before getting started to prevent any issues later on.
A vacuum is a must-have for this cleaning. A household vacuum with attachments can work but many who use a smaller or handheld version find better results overall. In either case, having a hose as well as nozzle attachments makes it easier to reach under strings and into areas of the case that might otherwise go unnoticed. For the vacuum itself, ensure cord length is long enough to not only get to the piano but also into the casing. If there is a problem getting there, an extension cord can help. Battery operated devices could also be a choice for these cleanings.
 The subject of compressed air is one that seems to split the community of piano owners. If you’re considering compressed air, try to use a compressor instead of a canned air device. The canned air options utilize liquids which could drip onto the delicate surfaces. Compressors instead push air out in a safe manner. That said, pushing air could be seen as damaging or may push dirt into irretrievable spots.
For your piano keys, Cory Key-brite works wonders for cleaning and brightening your keys while also protecting.
If your grand piano has a gloss finish, you’ll also want a good piano polish to make it shine. While it may be tempting to use Pledge or other furniture polish on your piano, resist that urge.
Exterior Detailing And Cleaning
The exterior shell of a grand piano stands out to all those who see it. Whether you are a regular piano player or love it as a showpiece for the room, making sure the exterior is in good shape ensures years of quality. Keep up with these important elements of the outer areas as you begin cleaning.
Cleaning The Piano Legs
Start with the legs of the grand piano. It might not seem like the first place you’d start, but these elements save time and put you in place to end up with the interior elements when this section is over. Among grand piano cleaning techniques, a microfiber cloth can do wonders. Use it to wipe down each leg and make sure that they are clear of dry debris. Soap and water in very limited amounts are also ok if any dirt and stains need to be removed. Avoid any harsh chemicals or items like furniture polishes that could interfere with the original finish. As you venture down each leg, make sure that all excessive fluids or authorized cleaning products are completely removed. Any remaining materials have been known to leave streaks on these surfaces if left unattended.
Cleaning The Piano Casters
For the wheels, also known as casters, it is important to focus on its central material. Most utilize brass, something that can be polished. Any cloth or product that is safe for use on the metal casters will say so on product packaging. For an in-depth read, check out our article on How to Polish Piano Wheels and Casters.
Cleaning The Piano Pedals
 In the same area, take time to inspect all pedals. Since they are made with various metals, it is best to look for a polish that is approved for that surface. Also, leave the liquid cleaners behind as they could bring on unwanted problems later. Instead, pay attention to the details as you polish the entire set and try pressing each pedal when finished to ensure nothing was dislodged. For this process, it is fine to use the same cloth used on wheels if the metals match. See our article on cleaning piano pedals for more info.
Cleaning The Piano Body
For the overall body and cover, you can use a damp (not wet) cloth to gently wipe down the piano in the direction of the wood grain. Make sure to use a fresh cloth for this as a used cloth may have debris that could scratch the piano’s finish. You can also use a professional piano cleaner for this as well such as Music Nomad’s All-in-1 cleaner. Make sure to pay attention to all nooks and corners as dust can accumulate in these crevices.
Cleaning the Piano Keyboard
 Of all parts that make up a piano, the keyboard is arguably the most recognizable. Use a soft duster or cloth to gently brush away dust or any outstanding debris. Determine which type of keys you are dealing with, most grand pianos have ivory keys but it is important to know for sure. The details should be included at the time of purchase or through the previous owner. Ivory keys often give themselves away through discoloration or heavier keys that feel more solid. Once you decide on the makeup of these keys, it’s time to wash each one.
Washing each one can be done on the frame itself. While some professionals take the keys off and do a heavy cleaning, it’s often easier and much safer to leave them on. If you do spot something wrong with a certain key, note it for a professional to look at on a later date. Instead, clean around it to avoid making the situation any worse or changing the makeup.
Use a new microfiber cloth for white keys and a separate microfiber cloth for the black keys. The major reason behind this comes from the colors that make up each one. Black keys are likely to face or create droplets in its selected color. Keeping selected cloths apart simply ensures that no colors run or blur into open spaces. Once this is set, simply mix together a cup of water with several drops of dishwashing liquid. Blend it thoroughly and dab the cloth gently into the mix with only an edge wet in any way. Rub each key from the top to the bottom, then across the end of each one. Make sure that no drops or excessive water is on the key at any time. After the process is complete, Use a cotton swab to go between the keys and remove anything left over after this service is finished.
Optionally, you can also use Cory Key-Brite to make your keys brighter.
Interior Detailing And Cleaning
 The interior of a grand piano is a beautiful thing for anyone who loves its music. The internal structure of a piano is made up of thousands of parts, although it may not always look that way at first glance. As such, cleaning inside a grand piano takes time and patience but, is also highly rewarding.
Raise the lid and inspect the hinges as well as both sides. If the lid itself includes a bar to prop it up, use it at this time. Once again, it’s time for the microfiber cloth you used on the legs and outer casing.
But first, try to remove any lingering dust and debris with a vacuum before wiping. The reason for bringing this tool into the equation is simple, you need something that will remove the dust from the air instead of trapping it on strings or other parts. Some cleaners could be tempted to utilize those quick static pickup cloths. Also, take this time to inspect the hinges for any rust or corrosion, as that can be prevalent in locations where moisture levels are higher. Note any instances of hinges that might need replacement or extra care from a professional.
Look for the plate in the mid-section beneath the strings.
A soft multi-sided brush should do most of the work this time. You can also use a vacuum here, using an attachment or a mini vac, to get into the hard to reach areas. Never introduce liquids into this section, it could corrode the part and run off into other vulnerable areas. Also, resist the temptation to add any polishes or other related products here.
Tuning pins are crucial to keeping strings at their best.
Between tuning sessions, it’s important to ensure each one is free from issues which could reduce needed tension. The pins are found along the plates and soundboard. They stand out and are hard to miss when it comes to locating them beneath strings. You can purchase a specialized piano pin brush that will reach the pins, but a soft toothbrush will also work. Like the other metal parts, keep liquid cleaners away from the pins. Instead, you should focus on a metal polish that can be applied directly to the pin itself. A small amount of polish should be placed at the top of each pin and worked towards its base with a small cloth or similar item that reaches into the area without touching strings.
Hammers are a part of what’s known as the action frame.
 Along with dampers, these crucial parts strike the strings to create the sound. It’s hard to miss a hammer as it lives up to its name through a row of independently moving pieces. Without taking out the entire action frame, which can be more difficult and time consuming than you were expecting, there are still some grand piano cleaning techniques which work. Press each key and wait for the hammer as well as the damper to lift. If someone is with you, they can hold the key as you clean it. Otherwise, consider a weighted item that can hold the position for you. With each hammer, use a clean and dry microfiber cloth to go over the entire structure. Be sure to look out for the fabric elements that are found on the bottom of each. They’re in place for a reason, to keep the strings safe and the sound smooth. Repeat the steps for each hammer and damper, ensuring that no part is damaged, especially as each one settles into place.
Bridges that lay underneath both treble and bass strings require their own considerations
Since bridges cannot be touched without direct contact with strings, you will need your pin brush again (or soft toothbrush) to reach. Make sure to follow up with a quick pass from the vacuum to pull out any debris. Keep an eye on the pressure you exert during this type of cleaning. Even soft bristles can leave marking or scratches if you push too hard. Instead, keep strokes light, much like you were finishing a painting.
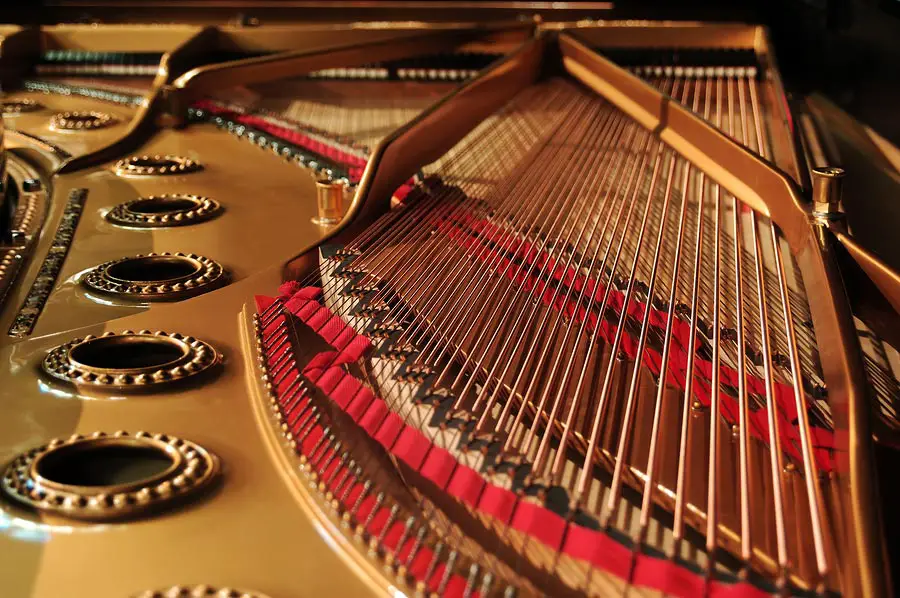
Treble and bass strings are difficult to navigate but essential.
 To reach strings, start out with a microfiber cloth. You can purchase a soundboard steel that will help you extend the cloth under the strings themselves or do it manually with a thin extender piece of some kind. Push back and forth under the strings in soft strokes. If something appears to be touching the strings, make extra accommodations to get around the problem. Follow up with a vacuum to ensure that any dust that has been dislodged is removed. For many situations, an attachment that concentrates the vacuum’s power into a thin, slotted movement is best.
The action frame offers a place for all of the vital parts such as hammers and keys. When keys move, they rely on this area to transmit each vibrant sound. Much like other parts of this instrument, grand piano cleaning techniques focus on how to best remove dust without disturbing the fragile areas. Keep the same thin attachment on the vacuum to protect everything from becoming dislodged during suction.
Cleaning a grand piano, as well as regular tuning, is something that every piano owner faces on a regular basis.
While it might seem like a hassle at first, realizing the importance on value, sound, and appearance makes this process more than worth it. All it takes is the time and tools to get the job done right the first time. You’ll love the results as the benefits can be seen and heard for some time to come.
Make sure to check out our other articles on cleaning and maintaining pianos and our recommended piano gear.